Hello! It's been quite a long time since I've posted anything on here, but I will be back soon! In the time I was absent from here, I had my first article published on STACK.com! Titled "3 Challenging Dumbbell Split-Squat Variations," I cover 3 different ways to change up your split-squat to add some variety to your routine. Here's the link: http://www.stack.com/a/3-challenging-dumbbell-split-squat-variations
Check it out! Thanks!
- Alex Adragna, CSCS
Tuesday, April 19, 2016
Monday, December 14, 2015
A Med Ball Slam Variation You're Missing!

Medicine balls are found in almost every single gym in the world. They are used for added resistance to abdominal exercises, or even thrown around for power movements. They are great and effective exercise tools. "Med ball" will be applied throughout today's post, just for training purposes.

Med balls come in all colors, sizes, forms, and have different exteriors and interiors. For the exercise being worked on today, the best choice is a non-bouncing med ball with a tough rubber external shell, as shown below. Non-bouncing med balls are best for slams to avoid the possibility of having a bad finishing position and getting hit right in the face! Another training consideration when it comes to the med ball is weight. A 20 pound med ball isn't always necessary. A SPEED component needs to be used with certain med ball techniques, and because people cannot throw around heavy med balls without injuring themselves, lighter may be better in this case.

Med balls can be used to train more than just abs! Triple flexion and triple extension can both be trained with med balls. These two basic, yet vital, movement patterns are crucial for explosive movements such as a jumping or sprinting. Triple flexion involves flexion of the hips, knees, and ankles, while triple extension involves extending the same three joints. The med ball slam is a great exercise for developing triple and trunk flexion by getting your whole body involved in the movement. Slamming the ball into the ground as hard as you can produces a great deal of force. This employs many muscle groups such as those in the shoulders, abdominals, hips, and legs, commonly known as the anterior torso or core muscles. Most people have probably seen others at gyms doing med ball slams. This is where a person picks up a med ball overhead, engages their whole body by flexing the torso and going into triple flexion, extends the arms down, and drives the med ball hard into the ground. Just in case, I've added an image of the med ball slam here:
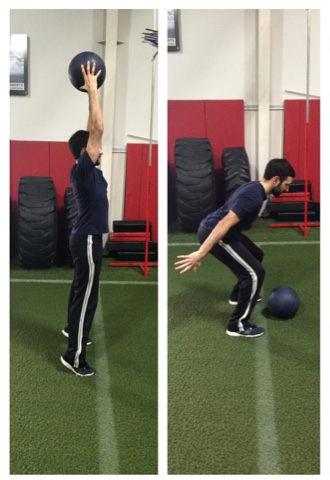
There's a way to continue this movement to use the posterior chain of the body as well. The posterior chain includes the muscle groups, tendons, and ligaments (mostly extensors) on the posterior of the body, such as the glutes, hamstrings, and upper and lower back muscles. Many of these are used when extending the body for the vertical jump mentioned earlier. The technique in today's post is a great exercise to develop power and explosiveness through both the anterior AND posterior chains of the body. How? By combining the med ball slam and the vertical jump into one continuous movement!
To begin, elevate the med ball of choice overhead with the arms extended. Quickly generate as much force as possible and slam the ball into the ground. This triple-flexed end position should look like a landing position for a jump. That is, hips should be sitting back, with the arms back, shoulders above the knees, and the knees above the toes. Once the deceleration/end position of the slam is reached, the amortization, or transition phase, of the vertical jump has simultaneously been reached! Using the force just created through the slam, quickly reverse the arms back up into the air and use triple extension to jump as high as possible. Always remember to land softly after jumping, finishing in the landing position (hips sitting back, with the shoulders over knees over toes).


Due to the complexity of the movement and high involvement of the nervous system, it should be done at the beginning of a workout. This exercise should be done for 3 to 5 sets of 3 to 5 repetitions. To further increase intensity, pick a slightly heavier medicine ball. Although many athletes will benefit by including this exercise in their workouts, volleyball and basketball athletes should definitely add this move to their training programs to help with their plyometric training, and for its sports-specificity. If the goal to increase vertical jump height for rebounds and spikes, this move should really be a go-to. Go give it a try and have some fun with the med ball!
- Alex Adragna, CSCS
Thursday, November 19, 2015
Stability Ball for Glute-Ham! Part 2

Hamstring injuries are excessively common. Almost everywhere it's heard from people, and also athletes, that they "tore" their hamstring. The worst part about it is that they're injuring themselves while doing simple daily activities or basic exercises. Even if the injury is as small as a muscle cramp or as large as a strain, the glute-ham area is usually neglected regardless in terms of training. Again, hamstring and glute strength being improved must be a necessity. Today's post is about the Stability Ball Leg Curl. Also known as the Stability Ball Hamstring Curl, this exercise builds upon the base movement built by the Stability Ball Glute Bridge, albeit with more hamstring activation.
Like I mentioned in my last post, the hamstrings have two functions: 1) extend the hips and 2) flex the knees. They are used daily along with the glutes and other muscles to help with walking, running, or jumping. Maintaining strength and flexibility in this area is crucial for sports performance as well as injury prevention. The Stability Ball Leg Curl can be used to assist with this.
This variation of the curl is an advanced movement that even the elite could have trouble with. I recommend mastering the Glute Bridge/Stability Ball Glute Bridge, as well as being able to do Eccentric, Isometric, and Single Leg Repetitions of the glute bridge with or without the ball.
Once positioned correctly, attempt to roll the ball in by contracting the glutes and hamstrings, and curling the legs in, aiming the heels of the feet towards the glutes. Keep the abs and body activated and raised above the ground at all times.

The exercise should be worked until 3-4 sets of 8-12 repetitions are possible. For advanced versions, attempt to do the glute bridge progressions such as eccentric repetitions (slow lengthening for seconds at a time), isometric repetitions (static holds for time at the top of the movement), or single leg curls for unilateral stability and strength (which I'll be discussing in future posts).

Alex Adragna, CSCS
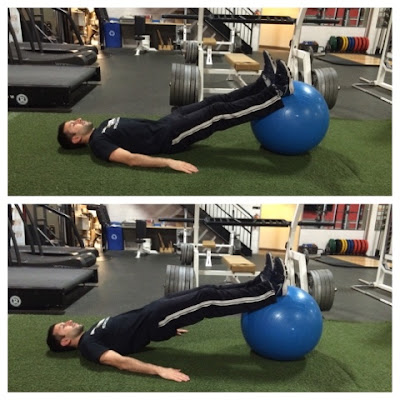
The Stability Ball Leg Curl is unlike a machine hamstring curl in that it not only activates the hamstrings and glutes, but also requires the torso, or "core" muscles, and stabilizer muscles in the area to be recruited to assist in the movement.
Stability Ball Leg Curl
To begin, lay down with the arms out on the ground, legs extended, and heels of the feet on the stability ball. Contract the abdominal and torso muscles, extend the hips, raise the body off the ground, and stabilize in this position before commencing the curl. This is the new starting position.

Once positioned correctly, attempt to roll the ball in by contracting the glutes and hamstrings, and curling the legs in, aiming the heels of the feet towards the glutes. Keep the abs and body activated and raised above the ground at all times.

The exercise should be worked until 3-4 sets of 8-12 repetitions are possible. For advanced versions, attempt to do the glute bridge progressions such as eccentric repetitions (slow lengthening for seconds at a time), isometric repetitions (static holds for time at the top of the movement), or single leg curls for unilateral stability and strength (which I'll be discussing in future posts).
BONUS!
With my previous post I didn't include any images of any advanced movements, so I've decided to cover the Single Leg Stability Ball Leg Curl with this post! The single leg curls are difficult even for advanced athletes, so do not get discouraged if unable to do them. Again, this builds up unilateral (single-side of the body) strength and stability in the leg, as compared to the Stabilty Ball Leg Curl, which works bilaterally.
With my previous post I didn't include any images of any advanced movements, so I've decided to cover the Single Leg Stability Ball Leg Curl with this post! The single leg curls are difficult even for advanced athletes, so do not get discouraged if unable to do them. Again, this builds up unilateral (single-side of the body) strength and stability in the leg, as compared to the Stabilty Ball Leg Curl, which works bilaterally.
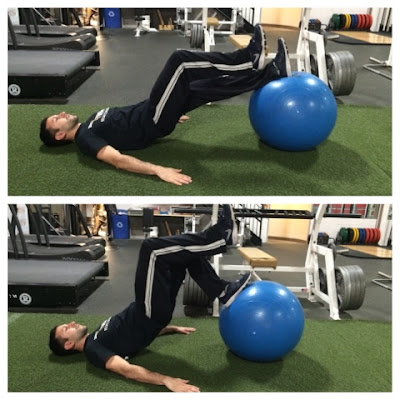
Single Leg Stability Ball Curl
To begin, lay down with the arms out on the ground, one leg slightly bent and elevated while the other leg is extended onto the ball. The heel of the extended leg should be placed on the stability ball. Once again, contract the abs and torso muscles, extend the hips, lift the body off the ground, and stabilize in this position before beginning the curl. The only difference is that more stability is required for this movement, as well as being able to keep the non-working leg elevated throughout the movement. This is the starting position.

After being positioned correctly, attempt to roll the ball in by contracting the muscles of the extended leg, and curling the leg in, aiming the heel of the working leg's foot inwards. Keep the abdominals and rest of the body activated and raised above the ground at all times.

Proficiency in the movement is only going to be achieved by practice and training. Test this technique and some of the progressions and let me know how it goes. Good luck!
Alex Adragna, CSCS
Wednesday, November 4, 2015
Stability Ball for Glute-Ham! Part 1

There are many great tools and exercises that help with improvement of this area. There is one simple piece of equipment that many people fail to utilize for these muscle groups: a stability ball. The exercise discussed in this post using the stability ball can be used to everyone's benefit. The best part is that the body provides the resistance!

Also known as a physio ball or yoga ball, the stability ball has been around for decades. These inflated training balls come in all sizes and are frequently used for abdominal exercises like crunches, but they can be used for so much more (This DOES NOT include putting weight on your back and trying to stand and squat on the ball!). A more productive use of the ball is to get the posterior chain fired up using some Stability Ball Glute Bridges. Let's break down this movement by isolating the move from the stabilty ball.
The glute bridge is a fundamental ground-based movement. It is known by many names: hip thrust, hip bridge, or even hip bump or "upa" for BJJ and MMA practitioners. This move activates the glutes and hamstrings by extending the hips. This is completed by putting force into the ground using the legs and feet, and keeping the rest of the body stable. Does this sound familiar? That's because the glute bridge is essential in providing the base for the big exercises such as the squat and deadlift. Here's how to do the glute bridge without the stability ball.
Glute Bridge (No Ball)
Start by laying on the floor, arms out flat at the sides against the ground. Once in a comfortable position, bend the knees until the feet are flat on the ground close to the glutes, a position most know as a sit-up position.

From here, contract the abdominal and torso muscles (which most people like to call, "the core"), press the heels into the ground to elevate the hips and extend them away until they are in line with the knees and shoulders, squeezing the glutes from the initiation of the repetition.

There's no need to hyperextend the hips and put unnecessary pressure on the lower back, so stop when the basic glute bridge position is achieved. Many can master the move fairly quickly, and move on to do advanced versions of it. Eccentric-count repetitions of it (meaning slowly lowering the hips to the ground for seconds at a time), isometric holds at the top of the movement for seconds at a time, or single leg versions of it with one leg elevated all increase difficulty. Work the glute bridge until 3-4 sets of 8-12 repetitions isn't a challenge any more ,and then try the advanced versions of it. Another way to increase difficulty is by adding an unstable surface. This is where the stability ball comes in.
By adding the ball, the same benefits from doing the glute bridge are obtained, but it now incorporates the stabilizer and torso muscles of the body to cause greater activation and assistance in the movement.
By adding the ball, the same benefits from doing the glute bridge are obtained, but it now incorporates the stabilizer and torso muscles of the body to cause greater activation and assistance in the movement.
Stabilty Ball Glute Bridge
Find an average-sized stability ball and place it on the ground in front of the feet. Adjust the body until it's close enough to place the feet on the ball keeping the hips flexed at about 90 degrees. Make sure the knees are also at that angle, while also getting set up similar to the start of the glute bridge (laying down with the arms at the sides).

Now that a stable start has been reached, begin by pushing the feet into the ball, raising the hips so that they are in line with knees and shoulders, squeezing the glutes at the top of the movement, and keeping the abdominal and torso muscles contracted. This uses the stabilty ball, adding a three dimensional element to the movement, so stabilization will be required. Work on staying steady throughout the movement, balancing the body, and avoiding unnecessary movements. Do not get discouraged if the feet disengage from the ball. Practice makes perfect.

Once proficiency in the movement is attained, increase sets and repetitions (work up to 3-4 sets of 8-12 reps) or try the advanced variations of the basic glute bridge (eccentric, isometric, or single leg bridge) on the stabilty ball. Most coaches and trainers program it in as an assistance or accessory exercise during various training phases, such as the general physical preparation (GPP) or active rest/off-season training phases, because of the low stress of the exercise. Once the Stability Ball Glute Bridge is mastered, we can move on to the Stability Ball Leg Curl. This will be discussed in my next post though so until then, please feel free to ask questions, message me here, and let me know what you guys think. Meanwhile, try the Stability Ball Glute Bridge and get to training!
Alex Adragna, CSCS
Friday, October 30, 2015
About Me
Hello! It's Coach Alex, here to give you a little background on myself.
I'm a National Strength & Conditioning Association (NSCA) Certified Strength & Conditioning Specialist (CSCS). I have a Bachelor of Science degree in Exercise Science from Montclair State University. I'm also a Parisi Speed School Certified Athletic Performance Specialist. I currently work at Parisi Speed School training athletes from all sports and age groups. There we work on improving abilities such as speed, strength, agility, power, conditioning, and coordination as well as preventing injury. I'm also American Red Cross Certified in Adult & Pediatric FirstAid/CPR/AED.
I have always enjoyed various sports and activities, training, and exercising and that's what led to my career path. In high school I did play soccer for a short time, but my main sport was track & field, where I was a varsity long and triple jumper. I won the 2009 New Jersey Scholar-Athlete Award my senior year as well. My other main passion has always been martial arts. I started taekwondo at the young age of 5 and did that basically my whole life. Almost my entire family, including my parents and younger sister, are black belts, and I'm very proud of that fact. I competed and was a state champion, and ended up receiving my 3rd degree black belt in it. I'm also a certified black belt by the World Taekwondo Federation. My passion for martial arts and training has led me to BJJ. Approximately four years ago I began training Brazilian Jiu-Jitsu (BJJ), the grappling martial art popularized by Royce Gracie at UFC 1, and have been hooked ever since. I'm currently a blue belt and am not going to stop, even after I reach the rank of black belt. I plan on training and competing in BJJ until I'm an old man and luckily I can plan training accordingly for myself!
I've tested training methods not only on myself, but athletes from soccer to tennis, MMA fighters, and even clients just trying to lose weight and get in shape. Luckily I've had success, but that doesn't mean I haven't made some mistakes or learned new things along the way. I plan on putting to good use what I know and always improving to be a better coach.
Enough about me - lets get to training!
Alex Adragna, CSCS
Thursday, October 29, 2015
Welcome to Adragna Athletics!
Hello! My name is Alex Adragna, CSCS, and I'd like to welcome you to Adragna Athletics! I'll be posting about topics such as strength & conditioning, improving sports performance, exercises and their many variations, and some injury prevention techniques. Those are just some of the subjects I'll be touching on, so be ready for more. Stay tuned!
Alex Adragna, CSCS
Subscribe to:
Posts (Atom)